Team Management
Overview
The Team Management module enables organizations to create, organize, and maintain teams within the application. It provides administrators with a centralized workspace to manage team structures, assign members and managers, and monitor team-related information efficiently.
Login → Team Management
Team Management Dashboard
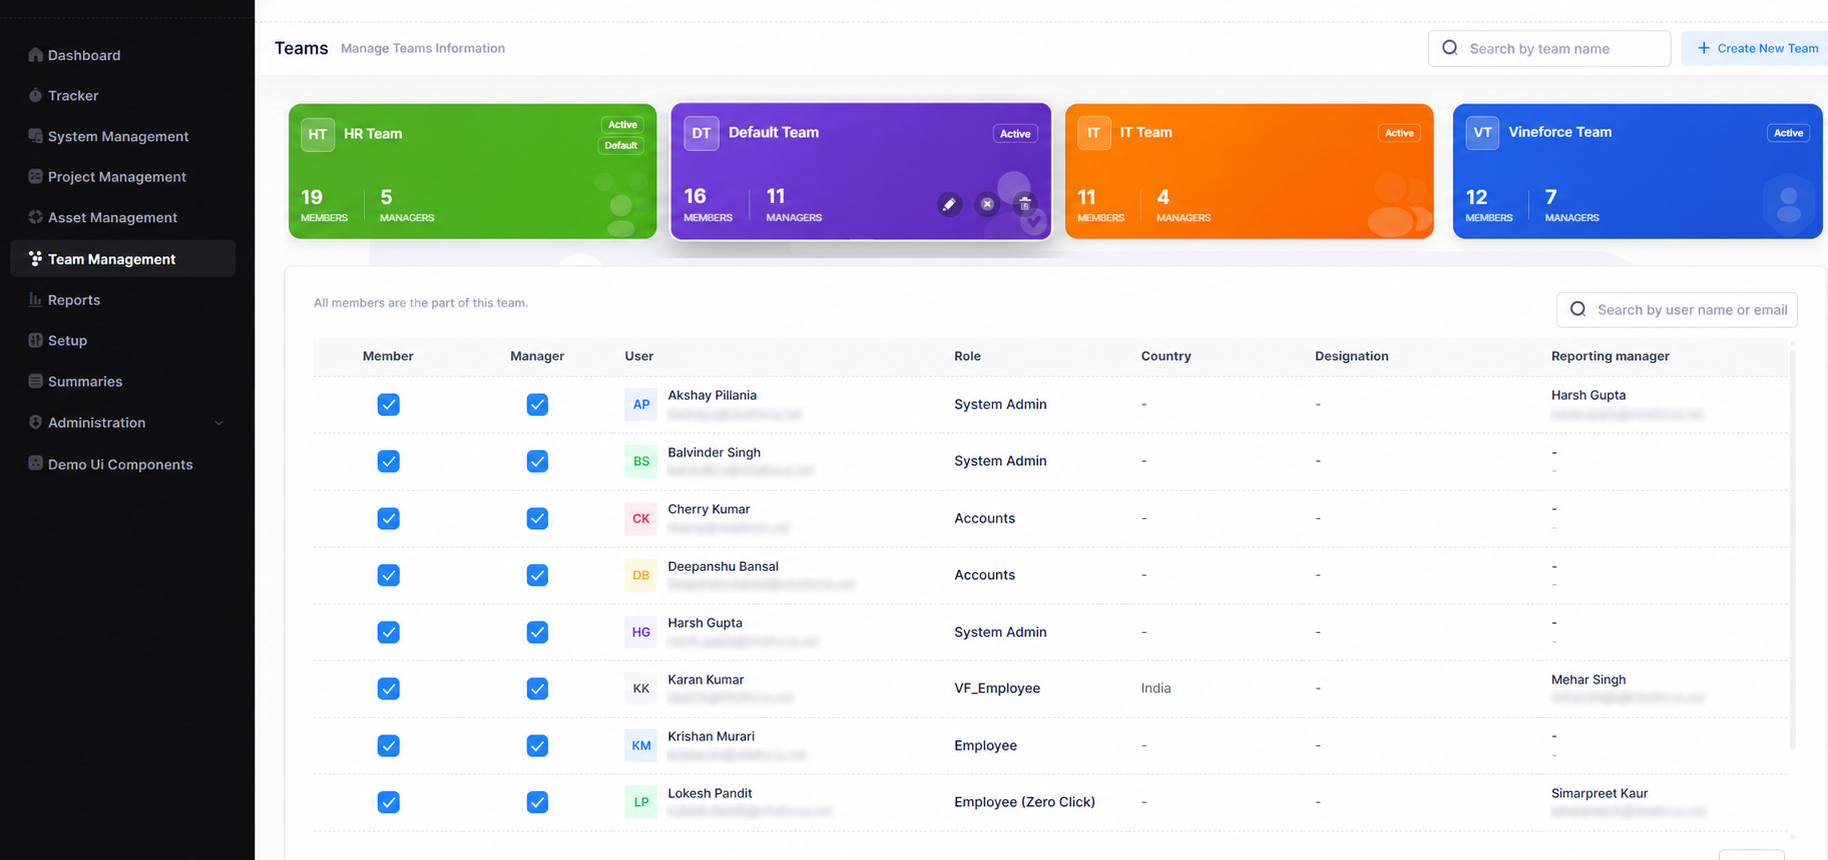
The dashboard provides an overview of all teams configured in the system. Teams are displayed as interactive cards, allowing users to quickly understand team composition and status at a glance.
Team Cards
Each team card displays the following information:
| Field | Description |
|---|---|
| Team Name | The display name of the team, shown prominently on the card |
| Status Badge | Indicates whether the team is Active or Inactive |
| Default Badge | Shown on the team designated as the default team |
| Total Members | Count of all users currently assigned to the team |
| Total Managers | Count of users assigned as managers for the team |
Quick Actions on Team Cards
Each team card provides icon buttons for common actions:
- Edit — Update team name, description, status, or default configuration
- Delete — Permanently remove the team from the system
- Activate / Deactivate — Toggle the team status using the status switch
Search and Filtering
Users can quickly locate teams using the search bar at the top-right corner of the dashboard.
Search by Team Name
- Locate the Search by team name field at the top-right of the dashboard.
- Enter any part of the team name.
- The dashboard instantly filters to display matching teams.
Search results update dynamically — there is no need to press Enter or click a Search button.
Create a New Team
Administrators can create new teams to organize users based on business requirements, departments, projects, or reporting structures.
Steps to Create a Team
- Click the + Create New Team button at the top-right of the dashboard.
- The Create New Team dialog will appear.
- Fill in the required and optional fields.
- Click Save to create the team.
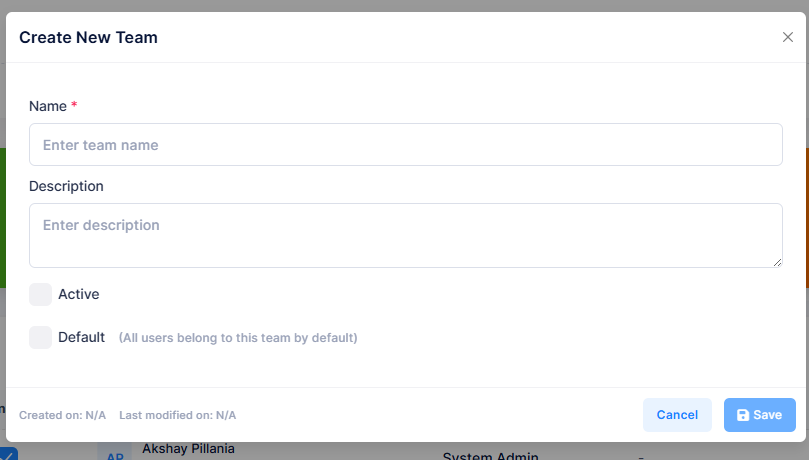
Create Team Form Fields
| Field | Required | Description |
|---|---|---|
| Name | Yes | The display name for the team. Must be unique and descriptive. |
| Description | No | An optional text description providing context about the team's purpose. |
| Active | No | Toggle to set the team as active upon creation. Active teams are available for use immediately. |
| Default | No | Check to designate this as the default team. All users belong to this team by default. |
Only one team can be designated as the Default team at a time. Enabling Default on a new team removes the default designation from the previously configured default team.
Managing Team Information
Existing teams can be updated at any time to reflect organizational changes.
Steps to Edit a Team
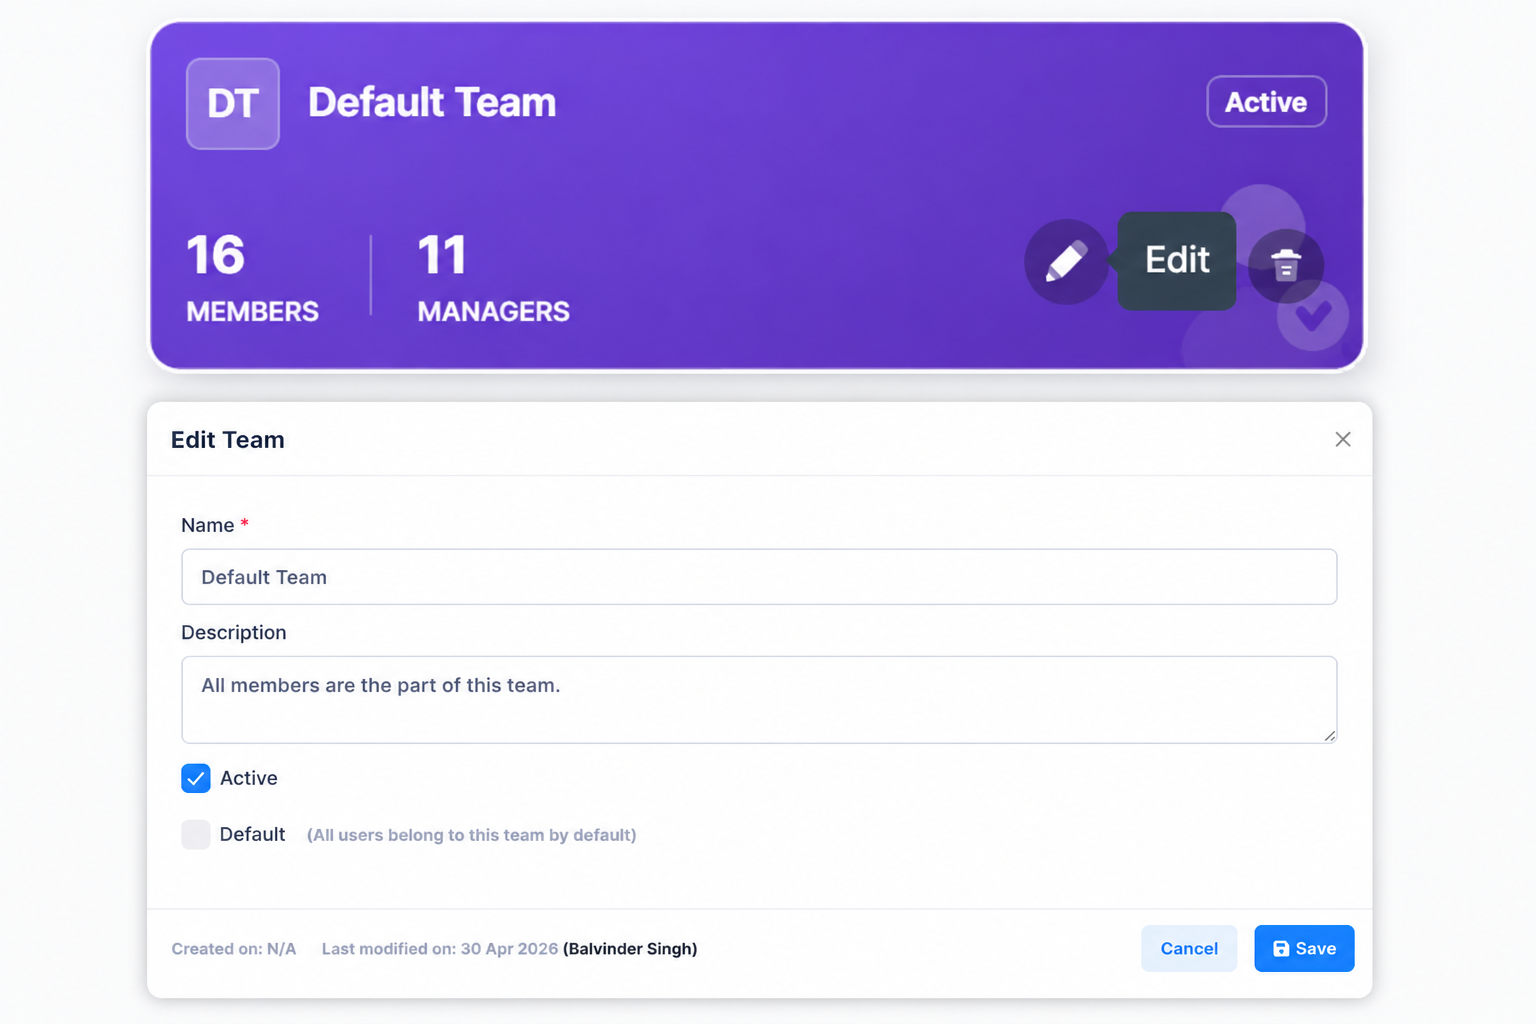
- On the dashboard, locate the team card you wish to edit.
- Click the Edit (pencil) icon on the team card.
- The Edit Team dialog will open with the current details pre-filled.
- Modify the relevant fields.
- Click Save to apply the changes.
Editable Fields
- Team Name
- Team Description
- Active Status
- Default Team Configuration
Assigning Team Members
Members can be associated with a team to establish clear ownership and collaboration structures. The member list is displayed below the team cards on the dashboard.
Member List Columns
| Column | Description |
|---|---|
| Member | Checkbox to mark the user as a member of the selected team |
| Manager | Checkbox to designate the user as a manager of the selected team |
| User | User avatar, full name, and email address |
| Role | The user's system role (e.g. System Admin, Employee, Accounts) |
| Country | Country associated with the user's profile |
| Designation | The user's job designation, if configured |
| Reporting Manager | The user's assigned reporting manager name and email |

Adding a Member
- Scroll to the user list below the team cards.
- Use the Search by user name or email field to locate the user.
- Check the Member checkbox in the user's row.
The user is immediately added to the team.
Removing a Member
- Locate the user in the member list.
- Uncheck the Member checkbox in the user's row.
The user is immediately removed from the team.
Assigning Team Managers
Managers can be designated within each team to support reporting relationships and team supervision. A team can have one or more managers.
Assigning a Manager
- Locate the user in the member list.
- Ensure the Member checkbox is already checked for that user.
- Check the Manager checkbox in the same row.
The user is now designated as a manager for the team.
Removing a Manager
- Locate the user in the member list.
- Uncheck the Manager checkbox in the user's row.
The manager designation is removed while the user remains a team member.
A user must be an active Member of a team before being assigned as a Manager. Unchecking the Member checkbox will also remove the Manager designation.
Default Team Configuration
Organizations can designate one team as the Default Team. This team acts as the standard assignment group for users who have not been explicitly assigned to another team.
When to Use a Default Team
- When new users require an initial team assignment upon account creation.
- When a standard organizational grouping is needed across the application.
- When business processes depend on a predefined fallback team.
Identifying the Default Team
The default team is clearly identified on the dashboard by a Default badge displayed on its team card, alongside the Active status badge.
Only one team should be configured as the Default at any time. Misconfiguration may lead to inconsistent user assignments across the application.
Activating and Deactivating Teams
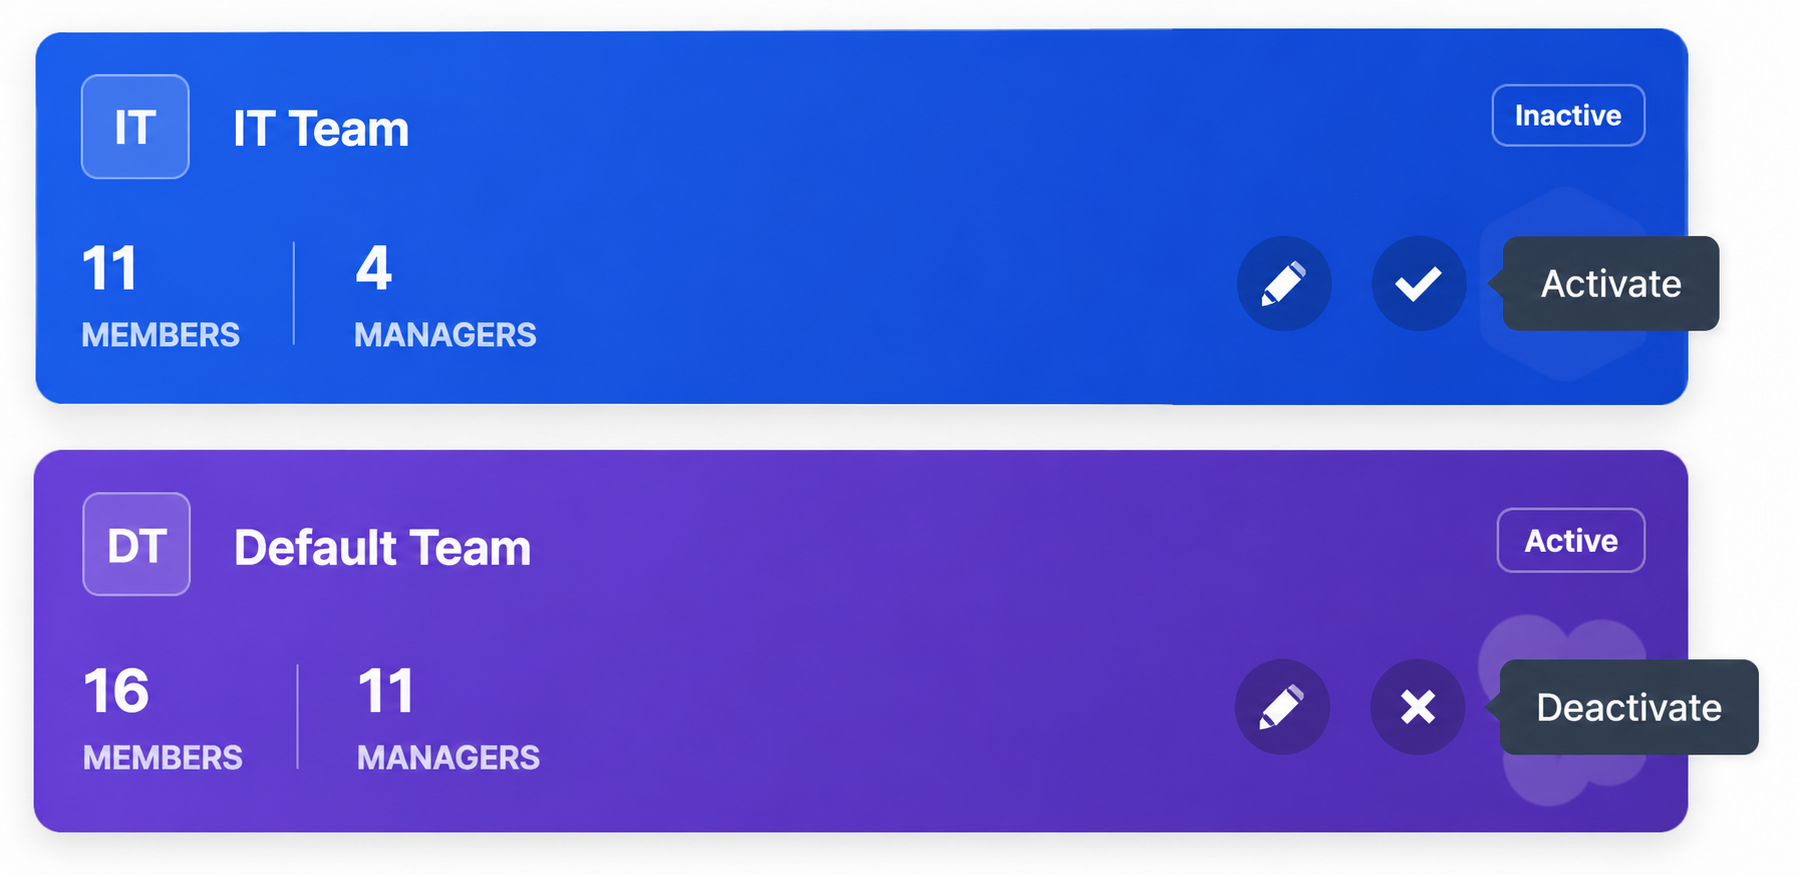
Teams can be activated or deactivated based on operational requirements, allowing administrators to manage team availability without permanently deleting historical data.
| State | Behavior |
|---|---|
| Active | Available for regular use. Can receive member assignments. Participates in ongoing operations. |
| Inactive | Stored in the system for historical reference. Not available for new operations. Can be reactivated at any time. |
Steps to Change Team Status
- Locate the team card on the dashboard.
- Click the status toggle switch on the team card.
- The team status updates immediately between Active and Inactive.
Deactivating a team preserves all historical member and manager data. Consider deactivating rather than deleting teams that may need to be referenced in the future.
Deleting Teams
Teams that are no longer required may be permanently removed from the system.
Steps to Delete a Team
- Locate the team card on the dashboard.
- Click the Delete (trash) icon on the team card.
- A confirmation dialog will appear.
- Click Confirm to permanently delete the team, or Cancel to abort.
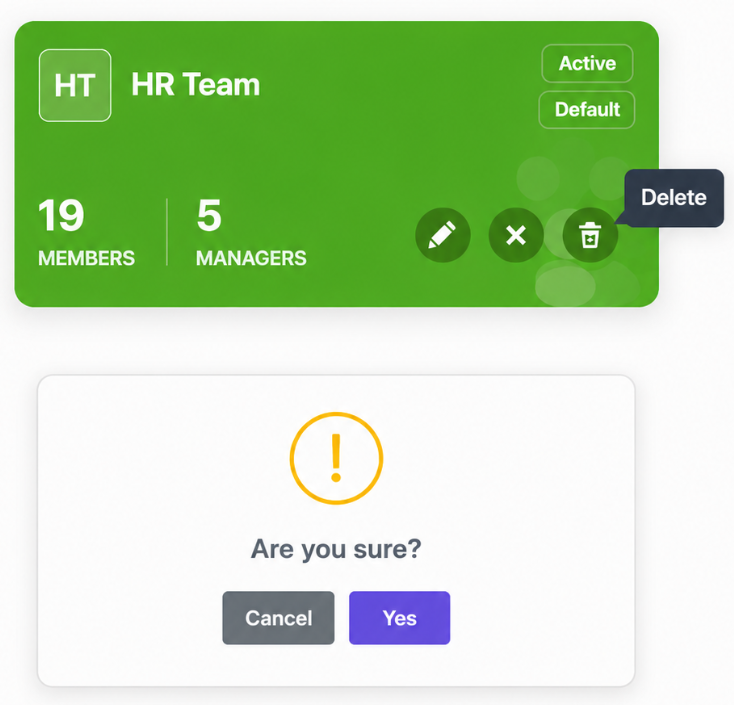
Deletion permanently removes the team record, including all member and manager associations. This action is irreversible. Consider deactivating the team instead if historical reference may be needed.
Best Practices
- Use clear, meaningful team names that reflect their purpose or department.
- Regularly review team memberships to ensure they reflect the current organizational structure.
- Keep manager assignments up to date when reporting lines change.
- Deactivate obsolete teams rather than deleting them when historical reference is important.
- Limit changes to the default team to authorized administrators only.
- Periodically validate team information for accuracy.
- Avoid creating duplicate teams with overlapping membership or purpose.