Project Management
Overview
The Project Management module provides a centralized workspace for planning, organizing, tracking, and maintaining projects throughout their lifecycle. It enables users to monitor project progress, manage project teams, maintain timelines, and keep project information organized in a single location.
Login → Project Management
Project Management Dashboard
The dashboard provides a consolidated view of all projects within the system. It presents project statistics through summary cards and a detailed project list, enabling users to quickly understand the overall project landscape.
Summary Cards
The top section of the dashboard displays four summary cards that provide a real-time snapshot of project status:
| Card | Description |
|---|---|
| Total Projects | Total number of projects in the system along with capacity usage (e.g. 13 / 200 Capacity) |
| Active Projects | Projects currently in progress, shown as a count and percentage of total |
| Overdue Projects | Projects that have exceeded their planned end date and require attention |
| Completed Projects | Projects that have been successfully delivered |
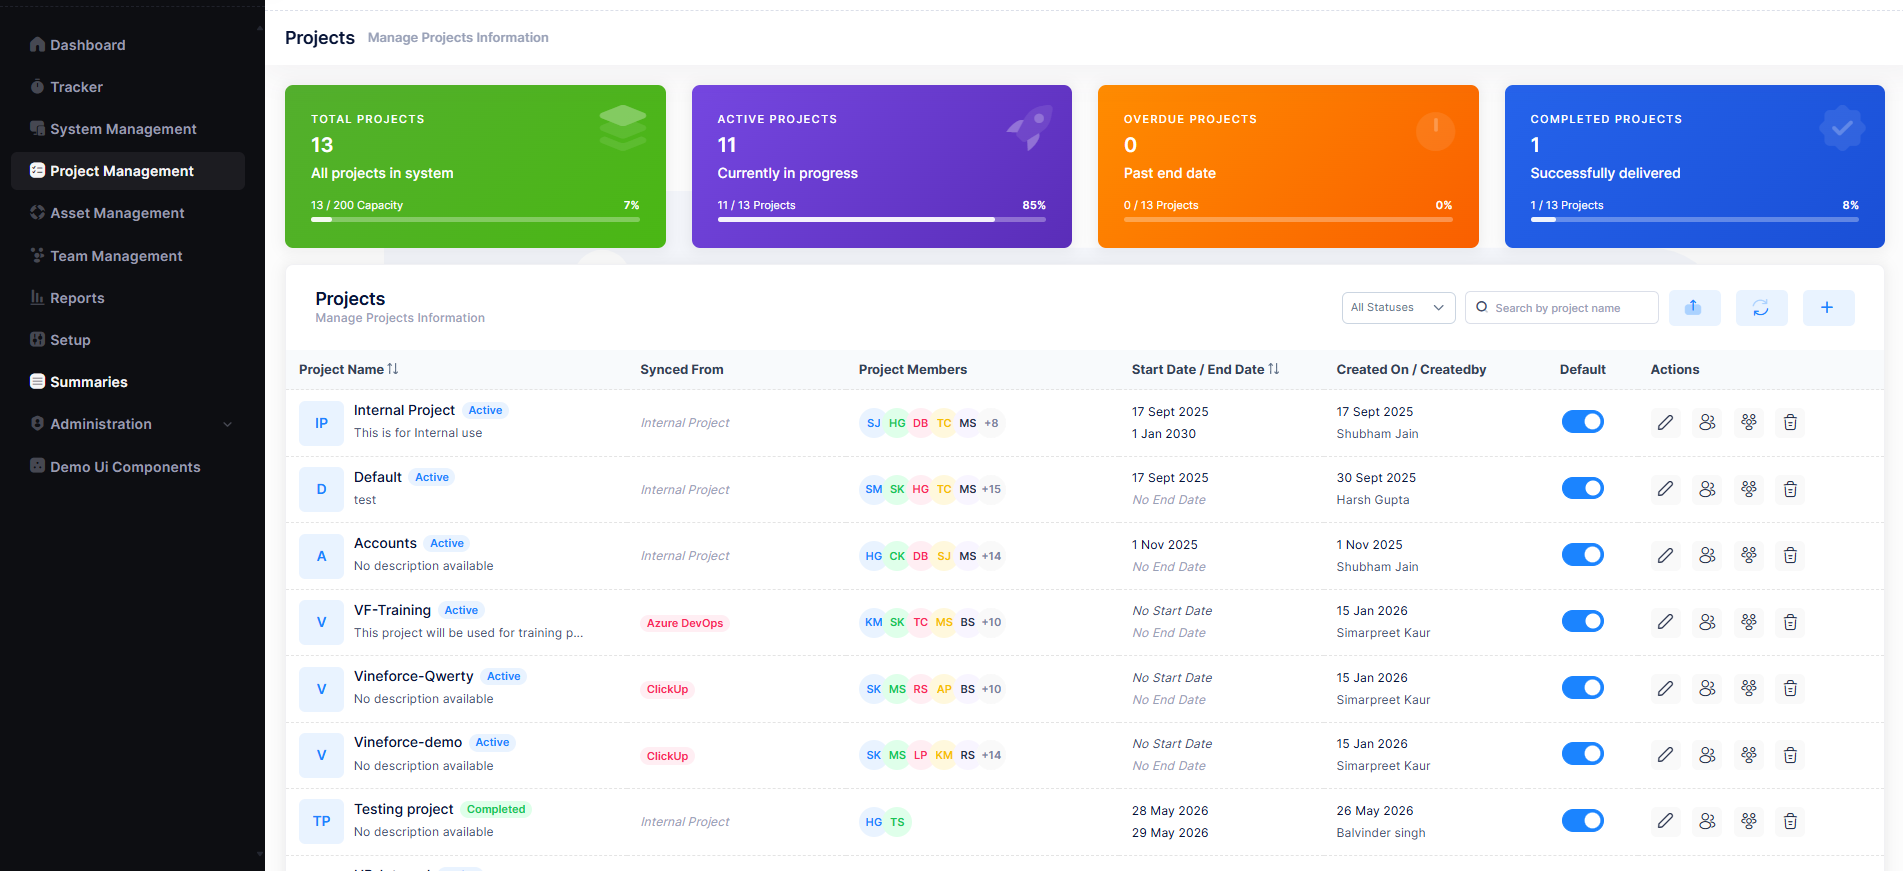
Project List
Below the summary cards, all projects are listed in a table with the following columns:
| Column | Description |
|---|---|
| Project Name | Project name with a status badge (e.g. Active, Overdue) and short description |
| Synced From | External source the project is synced from (e.g. Azure DevOps, ClickUp, or Internal Project) |
| Project Members | Avatars of assigned members with a count of additional members (e.g. +13) |
| Start Date / End Date | Project timeline with start and end dates. Displays No Start Date or No End Date if not set |
| Created On / Created By | Date the project was created and the name of the user who created it |
| Default | Toggle to indicate whether the project is the default project |
| Actions | Icons for Edit, Manage Members, Assign All Users, and Delete |
Search and Filtering
Users can quickly locate projects using the search and filter controls above the project list.
- Search by project name — Type any part of the project name to instantly filter the list.
- All Statuses dropdown — Filter the project list by status: All, Active, Overdue, Completed, or Inactive.
Search results update dynamically — there is no need to press Enter or click a Search button.
Create a New Project
Authorized users can create new projects to organize and track work effectively.
Steps to Create a Project
- Click the + button at the top-right of the project list.
- The Create New Project dialog will appear.
- Fill in the required and optional fields.
- Click Save to create the project.
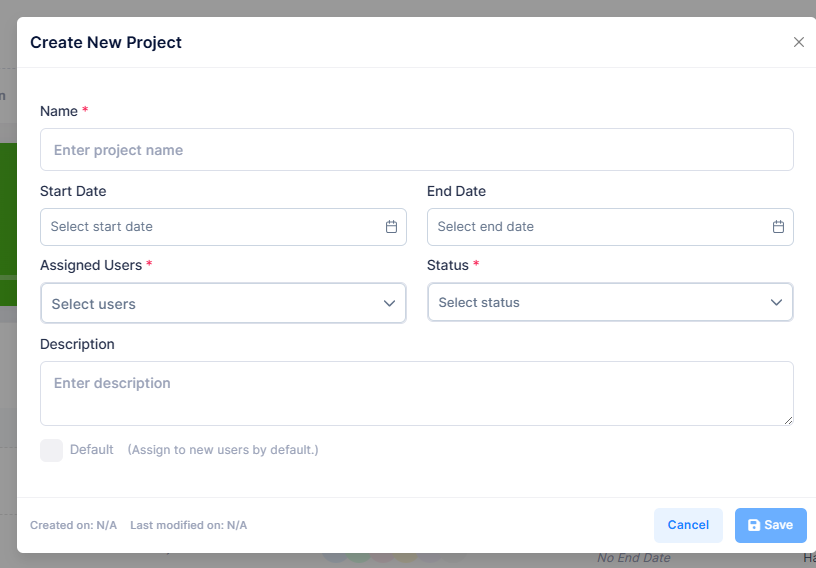
Create Project Form Fields
| Field | Required | Description |
|---|---|---|
| Name | Yes | The display name for the project. Must be unique and descriptive. |
| Start Date | No | The planned start date for the project. |
| End Date | No | The planned end date for the project. |
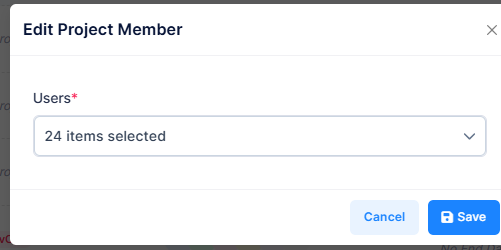
| Assigned Users | Yes | Select one or more users to assign as project members. |
| Status | Yes | Set the initial project status (e.g. Active, Completed). |
| Description | No | An optional text description providing context about the project. |
| Default | No | Check to designate this as the default project. New users are assigned to this project by default. |
Only one project can be designated as the Default at a time. Enabling Default on a new project removes the default designation from the previously configured default project.
Managing Project Information
Project details can be updated at any time as requirements evolve throughout the project lifecycle.
Steps to Edit a Project
- Locate the project in the project list.
- Click the Edit (pencil) icon in the Actions column.
- The Edit Project dialog will open with the current details pre-filled.
- Modify the relevant fields.
- Click Save to apply the changes.
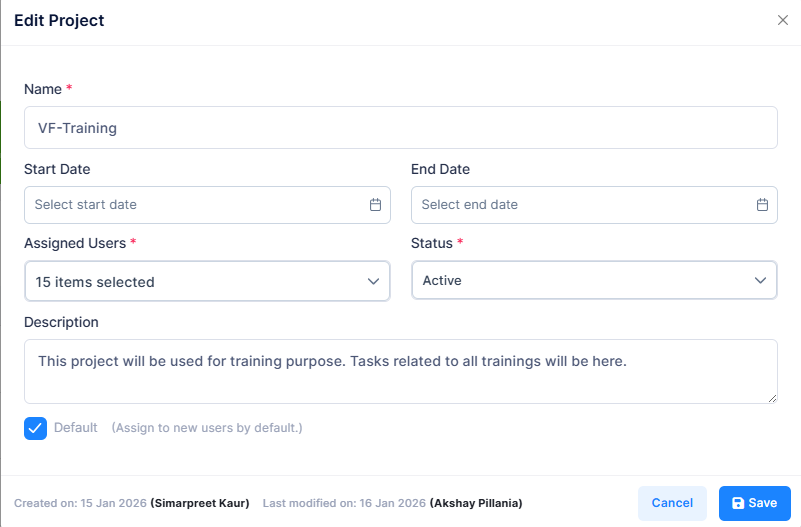
Editable Fields
- Project Name
- Start Date
- End Date
- Assigned Users
- Status
- Description
- Default Project Configuration
The Edit Project dialog also displays audit information at the bottom — Created on (date and user) and Last modified on (date and user) — for full change traceability.
Assigning Project Members
Projects involve collaboration among multiple users. The module provides dedicated tools for managing project membership.
Viewing Members Statistics
- Click the Members (people) icon in the Actions column for a project.
- The Members Statistics dialog opens, showing all current members with:
- Member avatar and name
- Date added to the project
- Added by (the user who assigned them)
- Delete icon to remove the member
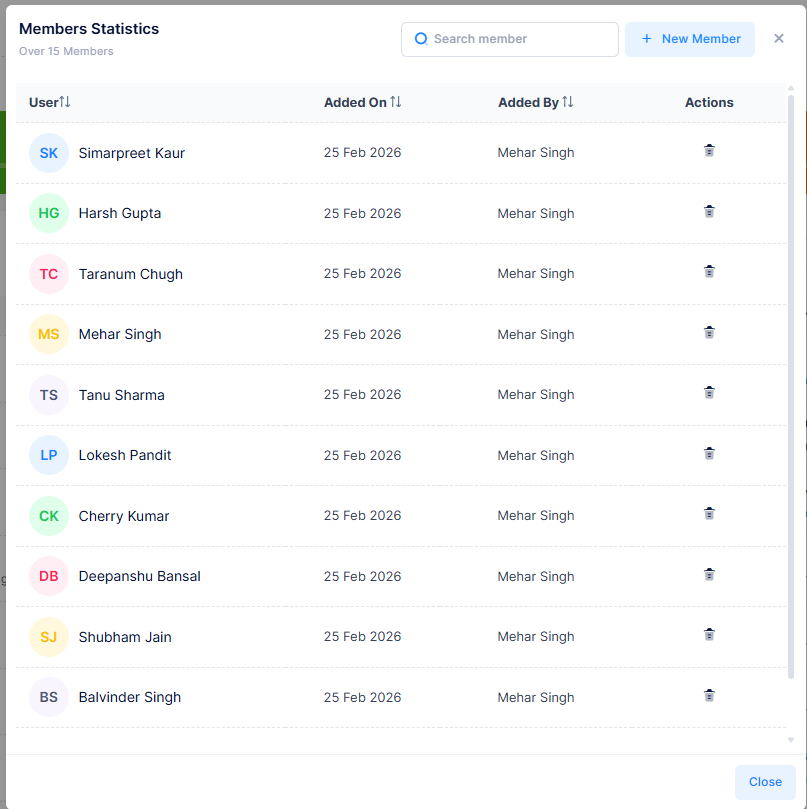
The Members Statistics dialog also provides:
- Search member — Search existing members by name.
- + New Member — Add new members to the project.
- Pagination controls for projects with a large number of members.
Adding New Members
- In the Members Statistics dialog, click + New Member.
- The Add New Project Members dialog will appear.
- Select one or more users from the Users dropdown.
- Click Save to add the selected users to the project.
Removing a Member
- Open the Members Statistics dialog for the project.
- Locate the member you wish to remove.
- Click the Delete (trash) icon in their row.
The member is immediately removed from the project.
Assigning All Users to a Project
Administrators can assign all system users to a project in a single action.
- Click the Assign All Users icon in the Actions column for the project.
- A confirmation dialog will appear: "Do you want to assign all users to '[Project Name]'?"
- Click Yes to proceed, or Cancel to abort.
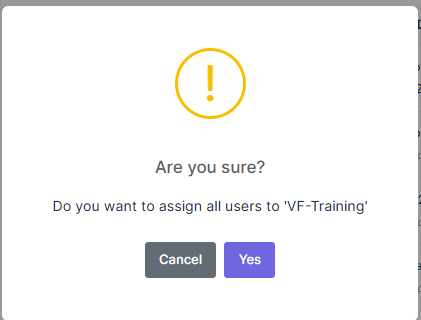
The Assign All Users action adds every active user in the system to the selected project at once. Use this with caution on projects that should have restricted access.
Default Project Configuration
A project can be designated as the Default Project based on organizational requirements.
When to Use a Default Project
- When new users require an initial project assignment upon account creation.
- When a standard project grouping is needed across the application.
- When business processes depend on a predefined fallback project.
Setting a Default Project
The Default toggle is available both in the Create New Project and Edit Project dialogs. Enable the Default checkbox to designate the project as default.
The Default column in the project list shows a blue toggle for the currently designated default project.
Only one project should be configured as the Default at any time. Misconfiguration may lead to inconsistent user assignments across the application.
External Integration
Projects can be synchronized with external project management tools, allowing users to maintain project information across multiple platforms while reducing duplicate data entry.
Supported Integrations
Click the External Integration (sync) icon at the top of the project list to open the External Integration Configuration dialog.

| Integration | Description |
|---|---|
| Azure DevOps | Link your Azure DevOps account to sync projects and members into this system. |
| ClickUp | Link your ClickUp account to sync projects and members into this system. |
Once connected, synced projects display the source name (e.g. Azure DevOps, ClickUp) in the Synced From column of the project list.
The availability of synchronization features depends on system configuration and user permissions. Contact your system administrator to enable integrations.
Deleting Projects
Projects that are no longer required can be permanently removed from the system by authorized users.
Steps to Delete a Project
- Locate the project in the project list.
- Click the Delete (trash) icon in the Actions column.
- A confirmation dialog will appear.
- Click Confirm to permanently delete the project, or Cancel to abort.
Deletion permanently removes the project record from the system, including all member associations. This action is irreversible. Ensure the project is no longer needed and that organizational retention policies permit deletion before proceeding.
Best Practices
- Use clear and descriptive project names that reflect the project's purpose.
- Always set start and end dates to enable accurate timeline tracking and overdue detection.
- Regularly review project memberships to ensure they reflect the current team structure.
- Update project statuses promptly to keep dashboard statistics accurate.
- Use the Assign All Users action only for projects that require organization-wide access.
- Limit default project changes to authorized administrators only.
- Monitor the Overdue Projects card and take corrective action early.
- Use external integrations (Azure DevOps, ClickUp) to avoid duplicate data entry across platforms.