Install Vineforce Teams Lite via PowerShell | Silent Deployment (Windows)
Install Vineforce Teams Lite via PowerShell
Windows 10 / 11 | Windows Server 2016+
This guide covers the fully automated PowerShell deployment of Vineforce Teams Lite — ideal for enterprise environments that need mass deployment across many machines.
One script handles everything automatically:
- Checks and installs .NET 9 (if not already present)
- Downloads the MSI installer from Vineforce CDN
- Installs silently using your authentication token
- Writes the token to
token.txtfor the application - Creates a Windows Scheduled Task so the app auto-starts on every user login
No user interaction is required after the script starts.
Prerequisites
| Requirement | Details |
|---|---|
| Operating System | Windows 10 / 11 or Windows Server 2016+ |
| PowerShell | Version 5.0+ (built-in on Windows 10/11) |
| Privileges | Must run as Administrator |
| Internet Access | Required to download .NET 9 and the MSI |
| .NET 9 | Installed automatically by the script if missing |
Step 1: Get Your Authentication Token
Contact your Vineforce Teams administrator to obtain your company-specific authentication token.
The token looks like this:
xxxxxxxx-xxxx-xxxx-xxxx-xxxxxxxxxxxx
Why is this token needed?
The authentication token links the desktop application to your company's Vineforce Teams environment. Without it, the application cannot connect.
Step 2: Download the PowerShell Script
Download install-vineforce-lite-window.ps1
Save the script to your Windows machine — for example:
C:\Installers\install-vineforce-lite-window.ps1C:\Users\YourName\Downloads\install-vineforce-lite-window.ps1
Step 3: Update the Script with Your Token
-
Open
install-vineforce-lite-window.ps1in Notepad or VS Code -
Find this line near the top of the file:
$authToken = "YOUR_AUTH_TOKEN_HERE" -
Replace
YOUR_AUTH_TOKEN_HEREwith your actual token:$authToken = "xxxxxxxx-xxxx-xxxx-xxxx-xxxxxxxxxxxx"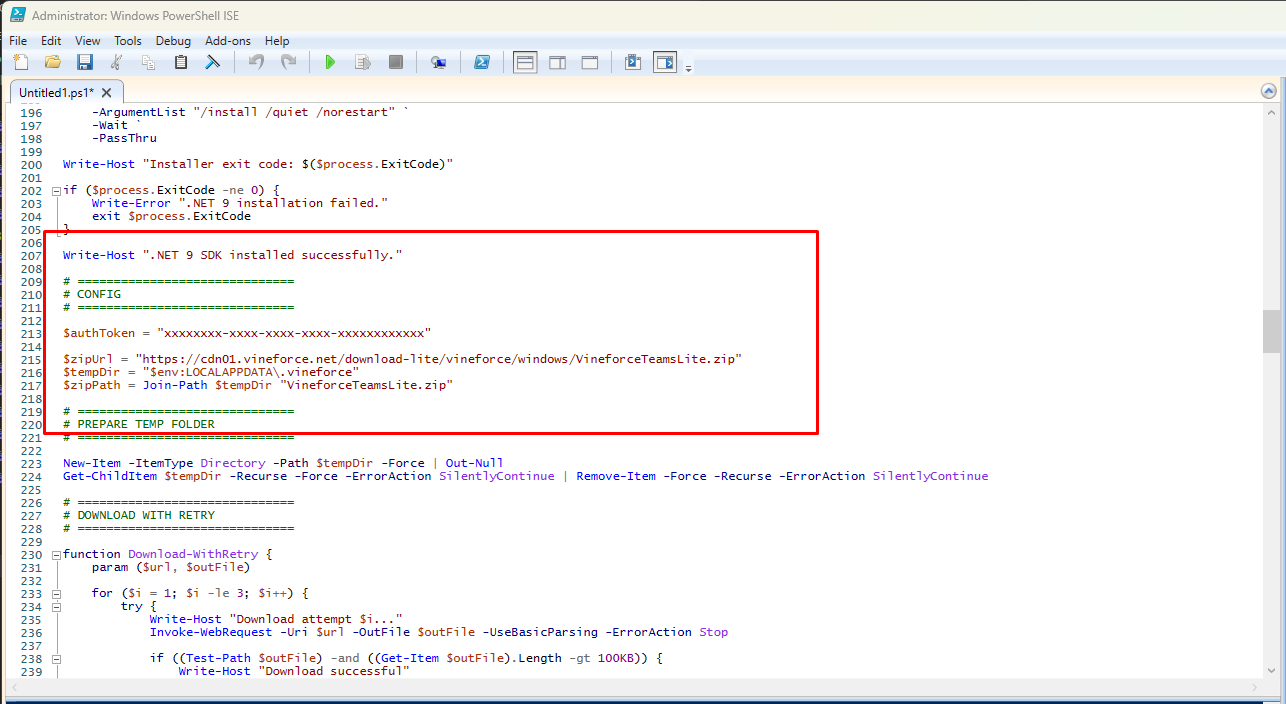
-
Save the file
Step 4: Run the Script as Administrator
The script must run with Administrator privileges to install software and register a Scheduled Task.
- Open File Explorer and locate
install-vineforce-lite-window.ps1 - Right-click the file
- Select Run with PowerShell
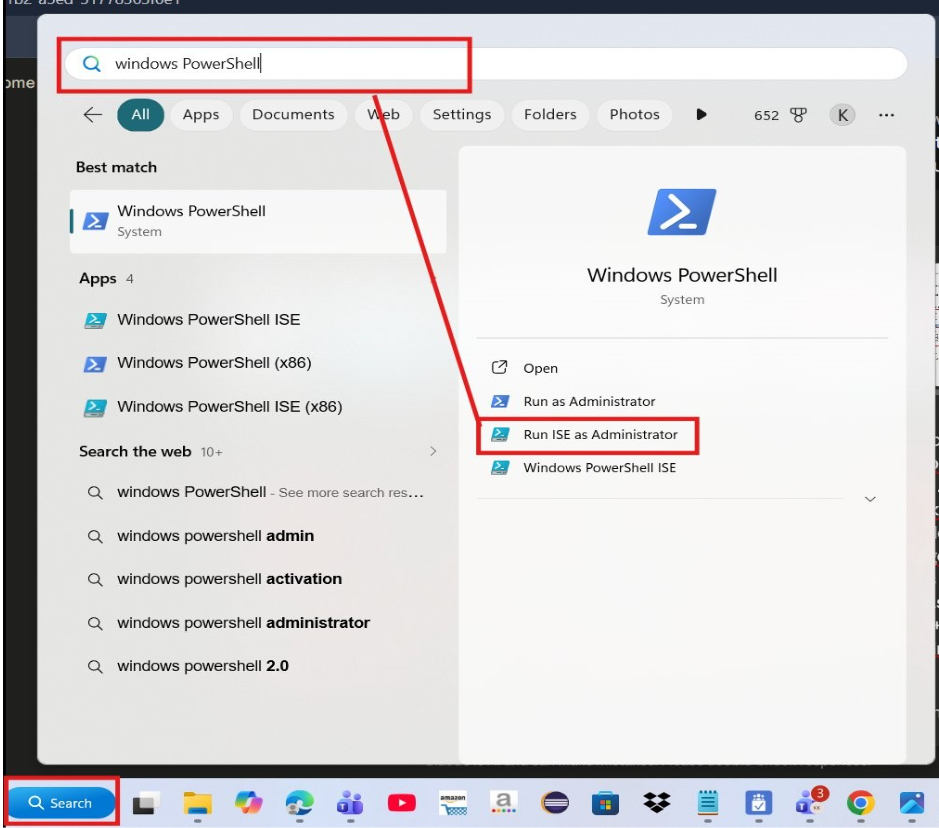
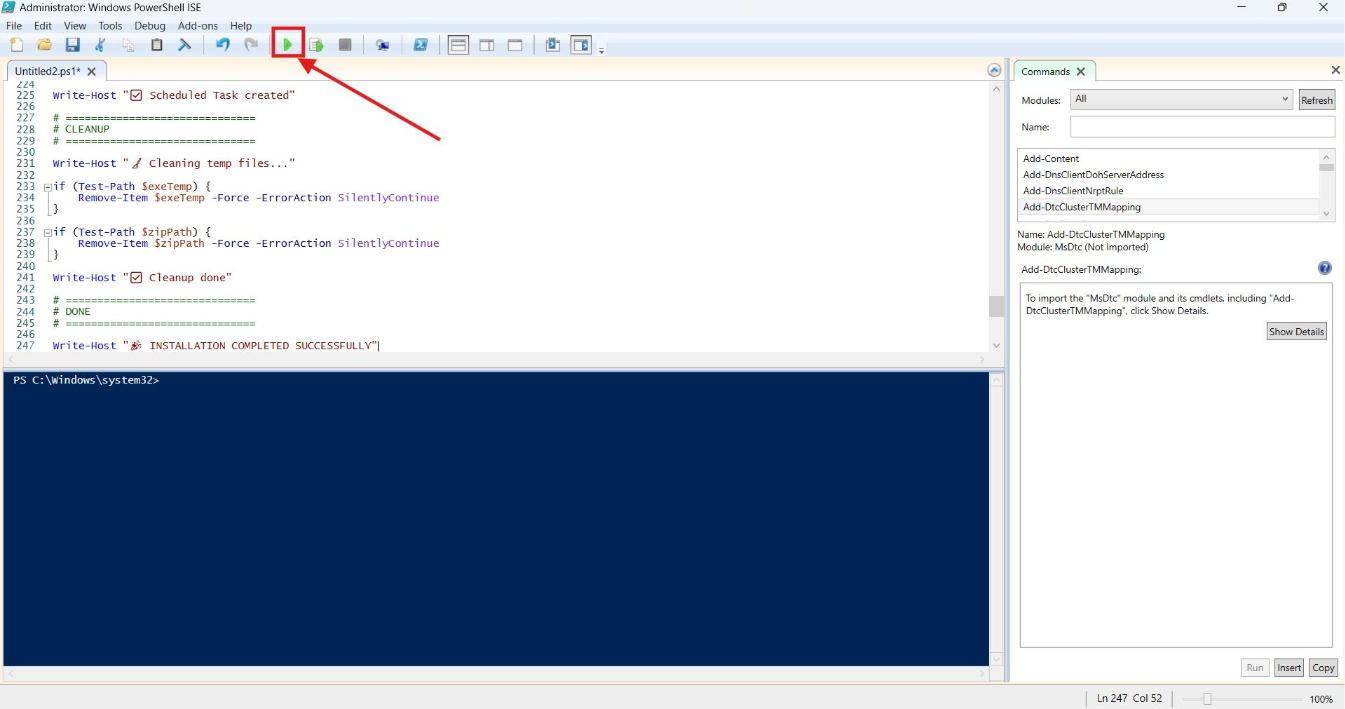
Windows may prompt: "Do you want to allow this app to make changes?" — click Yes.
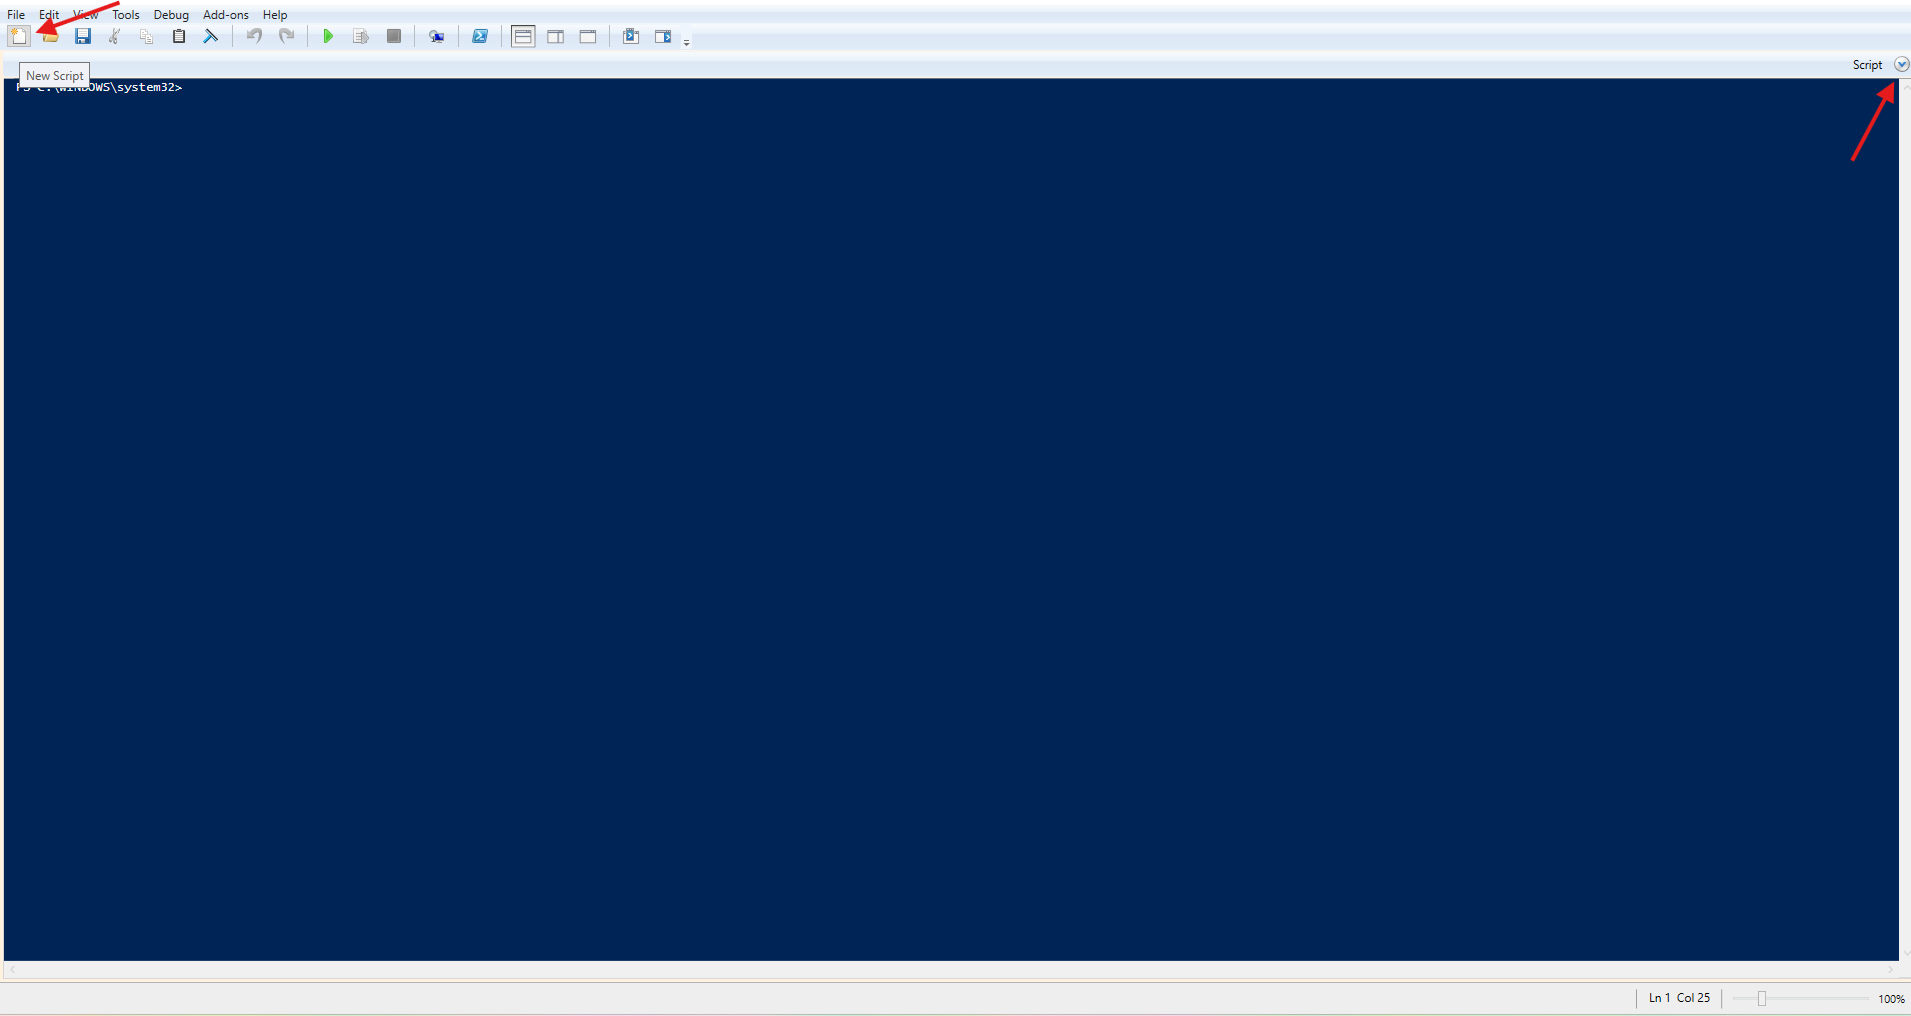
If PowerShell ISE opens showing only a blank blue console (no script editor pane visible), click the New Script button (top-left toolbar icon) or the dropdown arrow in the top-right corner next to Script to open the script pane.
Alternatively, from an elevated PowerShell window:
cd "C:\Installers"
.\install-vineforce-lite-window.ps1
Execution Policy If PowerShell blocks the script, run this first to allow local scripts:
Set-ExecutionPolicy RemoteSigned -Scope Process
Step 5: Verify the Installation
After the script completes, verify that everything installed correctly. Open PowerShell and run the following commands one by one.
The installation path includes your Windows username, so replace it with your own if typing the path manually. You can also use the $env:USERNAME variable in PowerShell to avoid this entirely — the commands below already do this for you.
Not sure of your username? Go to Settings → Accounts → Your info, or check under Accounts as shown below.
Check the Installation Log
Open the log file to confirm a successful install by running this command in PowerShell:
Get-ChildItem "C:\Users\$env:USERNAME\AppData\Local\.vineforce\" | Where-Object { $_.Name -like "*.log" }
A successful installation shows Exit Code 0 in the log.
Check the Token File
Confirm the token file was created by running this command in PowerShell:
Get-Content "C:\Users\$env:USERNAME\AppData\Local\.vineforce\token.txt"
It should display your authentication token.
Check the Scheduled Task
Verify the Scheduled Task is registered by running this command in PowerShell:
Get-ScheduledTask -TaskName "VineforceTeamsLite"
Vineforce Teams Lite will start automatically the next time you restart your computer or sign in to Windows.
If it does not start automatically after a system restart, double-click the Vineforce Teams Lite icon to open it manually.
Check the Running Process
After the next user login (or after the task triggers), verify the application is running:
- Open Task Manager (
Ctrl + Shift + Esc) - Go to the Details tab or Background processes
- Look for Vineforce Teams Lite
If the process appears, the application is running silently in the background.

Troubleshooting
| Problem | Solution |
|---|---|
| Script won't run | Ensure PowerShell runs as Administrator. Run Set-ExecutionPolicy RemoteSigned -Scope Process if execution policy blocks the script. |
| Exit Code not 0 | Check the log file at C:\Users\<YourUsername>\AppData\Local\.vineforce\ (or run echo $env:USERNAME to confirm your username) for the specific error. |
| token.txt not created | Installation failed. Check the log file — fix the error and rerun the script. |
| .NET 9 install fails | Ensure internet access and that no firewall blocks builds.dotnet.microsoft.com. |
| MSI download fails | Ensure internet access and that no firewall or proxy blocks cdn01.vineforce.net. |
| Scheduled Task not running | Run Get-ScheduledTask -TaskName "VineforceTeamsLite" to confirm it exists. Check Task Scheduler for errors. |
| Antivirus blocks the app | Add C:\Program Files (x86)\Vineforce\Vineforce Teams Lite\ to your antivirus exclusions. |
Best Practices
- Always run the script as Administrator
- Update the auth token in the script before deploying — each company token is unique
- Review the log file after each deployment to confirm success
- Add the Vineforce Teams Lite folder to antivirus exclusions before deploying at scale
- Use the Scheduled Task verification step to confirm auto-start is configured correctly
What's Next?
Once installation is complete, Vineforce Teams Lite will:
- Will start automatically the next time you restart your computer
- Run silently in the background — no user interaction required
- Begin tracking activity and syncing with your Vineforce Teams server
View the recorded data in the Vineforce Teams Web Application.